OwlFC-Mini Manual
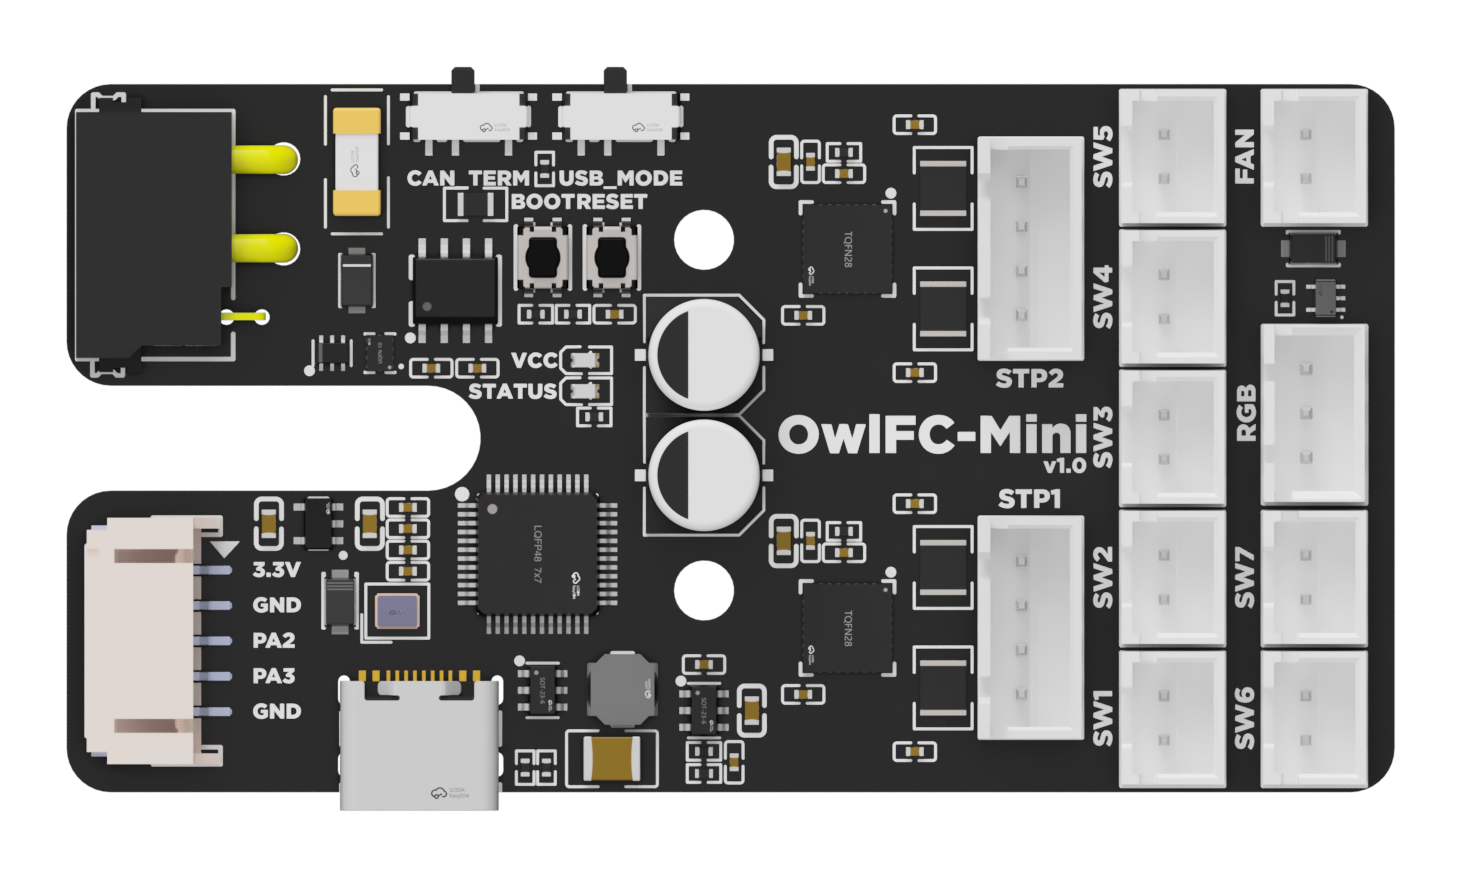
OwlFC-Mini Features
OwlFC-Mini is a 2-lane filament changer controller PCB designed for NightOwl filament changers. It features:
- 2x Onboard TMC2209 Stepper Drivers
- 7x Internal, 2x External Switch Connectors
- 1x ARGB LED Connector
- 1x Fan Connector (Optional, Always-On)
- STM32G0B1 MCU
- USB and CAN Support (Onboard MUX)
- 5V 1A Buck Converter
Resellers
United States
Pinout
- VIN is 4A fused.
- The fan connector is always-on and runs at VIN voltage.
USB/CAN Mode Switch
OwlFC-Mini carries both power and data over its single Power & Data In connector. The H and L pins of this connector act either as CAN_H/CAN_L or as USB D+/D-, selected with the USB/CAN Mode Switch:
- CAN position: H and L are CAN_H and CAN_L. Connect them to your CAN bus.
- USB position: H and L are USB D+ and D-. To connect them to a USB port on your host, use the USB Adapter to protect your SBC.
The USB C port on the board is only used for firmware flashing, it's not easy to access when mounted inside a NightOwl.
If you're using USB mode with a USB Adapter, expand to see the adapter's pinout
CAN Termination Switch
This switch connects a 120Ω termination resistor across the CAN lines. Set it to the "Terminated" position if the OwlFC-Mini is at an end of your CAN bus, and to the "No Termination" position otherwise. A CAN bus needs exactly two termination resistors, one at each end of the bus.
Firmware Flashing (CAN with Katapult)
First of all, make sure CAN is already set up on your printer. You can follow Esoterical's guide here: https://canbus.esoterical.online/
- Set the USB/CAN Mode Switch to the CAN position.
- Connect the OwlFC-Mini's Power & Data In connector to power and your CAN bus, connect a USB C cable, and turn it on.
- SSH into Pi.
- Install Katapult using
git clone https://github.com/Arksine/katapult. - Go to
~/klipper, do amake clean, thenmake menuconfig, use the Klipper settings below, thenmake. - Go to the Katapult directory
cd ~/katapult/, do amake clean, thenmake menuconfig, use the Katapult settings below, thenmake. - On the OwlFC-Mini, hold the BOOT button. While holding it press and release the RESET button, then release the BOOT button.
- Use
lsusbto verify that your OwlFC-Mini is in DFU mode. - Flash Katapult using
sudo dfu-util -a 0 -d 0483:df11 --dfuse-address 0x08000000:leave -D out/canboot.bin. - Use
~/klippy-env/bin/python ~/klipper/scripts/canbus_query.py can0to find OwlFC-Mini's UUID. It'll say Canboot next to it. - Flash Klipper using
cd ~/katapult/scripts && python3 flashtool.py -i can0 -f ~/klipper/out/klipper.bin -u <uuid>, replace<uuid>with your OwlFC-Mini's UUID. - Disconnect the USB C cable.
Klipper settings:
[*] Enable extra low-level configuration options
    Micro-controller Architecture (STMicroelectronics STM32)  --->
    Processor model (STM32G0B1)  --->
    Bootloader offset (8KiB bootloader)  --->
    Clock Reference (8 MHz crystal)  --->
    Communication interface (CAN bus (on PD0/PD1))  --->
(1000000) CAN bus speed
[*] Optimize stepper code for 'step on both edges'
()  GPIO pins to set at micro-controller startup
Katapult settings:
    Micro-controller Architecture (STMicroelectronics STM32)  --->
    Processor model (STM32G0B1)  --->
    Build Katapult deployment application (Do not build)  --->
    Clock Reference (8 MHz crystal)  --->
    Communication interface (CAN bus (on PD0/PD1))  --->
    Application start offset (8KiB offset)  --->
(1000000) CAN bus speed
    Build Optimization Override (Size (-Os))  --->
()  GPIO pins to set on bootloader entry
[*] Support bootloader entry on rapid double click of reset button
[ ] Enable bootloader entry on button (or gpio) state
[*] Enable Status LED
(PA13)  Status LED GPIO Pin
Firmware Flashing (USB)
- Set the USB/CAN Mode Switch to the USB position.
- Connect the OwlFC-Mini to power and USB using the adapter, turn it on.
- SSH into Pi.
- Go to
~/klipper, do amake clean, thenmake menuconfig, use the settings below, thenmake. - On the OwlFC-Mini, hold the BOOT button. While holding it press and release the RESET button, then release the BOOT button.
- Use
lsusbto verify that your OwlFC-Mini is in DFU mode. - Flash Klipper using
make flash FLASH_DEVICE=0483:df11. - Use
ls /dev/serial/by-id/*to find your OwlFC-Mini's serial address.
[*] Enable extra low-level configuration options
    Micro-controller Architecture (STMicroelectronics STM32)  --->
    Processor model (STM32G0B1)  --->
    Bootloader offset (No bootloader)  --->
    Clock Reference (8 MHz crystal)  --->
    Communication interface (USB (on PA11/PA12))  --->
    USB ids  --->
[*] Optimize stepper code for 'step on both edges'
()  GPIO pins to set at micro-controller startup
To use USB for the Klipper connection when deployed, set the USB/CAN Mode Switch to the USB position and connect the H (D+) and L (D-) pins of the Power & Data In connector to your host using the USB Adapter.
Software Setup
OwlFC-Mini support is being added to:
Docs will be updated soon with more details as soon as support is added.
Printed Parts
OwlFC-Mini uses a printed mount and a connector cover, which can be found on the OwlFC-Mini GitHub repository.
| Part | Download |
|---|---|
| Insert | Insert.stl |
| Corner | Corner.stl |
Thanks
- mjonuschat
- thomasfjen
- adamstorm
- jimmyjon711
- Schlonky
- Ravn
- thunderkeys
- Sanity